
What is the Settings Menu?
The settings menu is a menu for selecting the settings page of the Same Term Pager plugin. The menu contents are only visible to users with administrative privileges, but it allows you to configure settings related to site behavior and display.
How to Use General Settings

In “General Settings,” you can configure basic settings that affect the entire site. The settings you configure here will be reflected in pages and features visible to all users, including visitors who are not logged in.
Saving and Applying General Settings
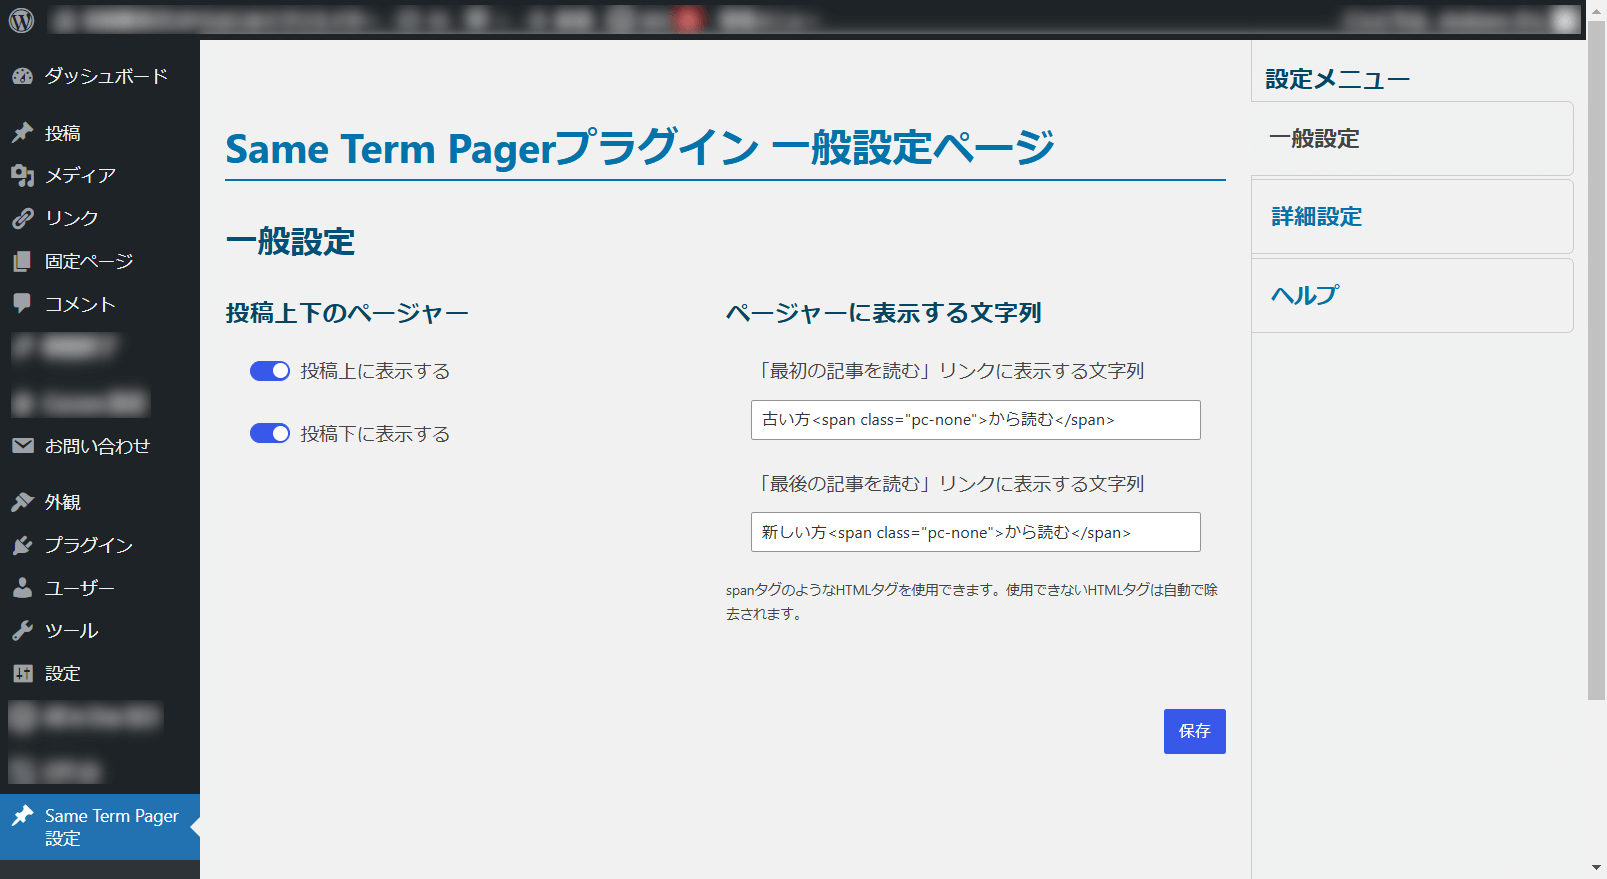
- Select “General Settings” from the settings menu.
- Change each item as needed.
- Click the “Save” button located at the bottom right of the screen.
- A confirmation dialog will appear. If you want to save, click “OK”.
- Changes will be applied to the site.
Make sure to save your changes; they will not be applied unless saved. If there are changes to the settings, a confirmation dialog will appear when navigating away or reloading the page. Clicking “Leave this Page” will discard the changes. To save the changes, click “Cancel” to cancel the page navigation and start over from step 3.
Detailed Explanation of General Settings
Pager Above and Below Posts
- You can choose whether to display a pager (navigation for moving between pages) above and below post pages by toggling a button. The pager is displayed only on post pages (including custom posts) and not on other pages (static pages, archive pages, front pages, etc.).
- When the toggle button is enabled, a pager created by the Same Term Pager plugin will be displayed above and below the post content. Below are sample states of the toggle button for explanation purposes.
- This setting is enabled from the time the Same Term Pager plugin is installed, so you can check the pager functionality immediately after installation. If you want to disable it, toggle the button to the disabled state and save.
- The filtering function is enabled when navigating from various archive pages (category, tag, custom taxonomy). When navigating from the site’s top or other navigation links, it will not be filtered and posts will be retrieved based on post date.
- You can easily navigate to previous and next posts, as well as the oldest and latest posts, within the categories, tags, or custom taxonomies you have set.
- If you do not want to display the pager above and below posts and want to add it elsewhere, disable the “Pager Above and Below Posts” setting. For adding the pager to other locations, please refer to the “How to Add Pagers” instructions.
Custom Text for Pager
You can customize the text displayed for the “Read the oldest post” and “Read the latest post” pagination links. This allows you to modify the labels for these pagination links to fit your needs.
How to Customize
- Navigate to the “General Settings” page.
- In the “Custom Text for Pager” section, you will find two text fields:
- Text for “Read the oldest post”
- Text for “Read the latest post”
- You can enter custom text in these fields. For example:
- Latest
<span class="pc-none">Start from the </span>oldest post<span class="sp-none">New</span><span class="pc-none">Begin reading the latest post</span>
- The text entered will be applied to the corresponding pagination links.
Using HTML Tags
You can use HTML tags like <span>, <b>, <i>, and others that are allowed by WordPress’ wp_kses_post() function. Unsupported tags will be automatically removed.
Here are the allowed HTML tags:
<b><del><em><i><strike><strong><span>- and more.
Special Note for the “pc-none” and “sp-none” Classes
If you want to hide specific parts of the text in the PC view but display it in a mobile or sidebar layout, you can use the “pc-none” class. Text wrapped in this class will not be displayed when the pager is shown in a single-line layout on PC, but it will appear when the pager links stack vertically in narrow views, such as in mobile or sidebar displays.
Similarly, if you want to hide specific parts of the text in the mobile or sidebar layout but display them in the PC view, you can use the “sp-none” class. Text wrapped in this class will not be displayed when the pager is shown in a mobile or sidebar layout, but it will appear in the PC view when the pager links are displayed horizontally.
For example:
<span class="pc-none">Start from the </span>oldest post
In PC view with a single-line layout, only “oldest post” will be shown. In mobile view (600px or less), or in the sidebar, “Start from the oldest post” will be fully visible.
<span class="sp-none">New</span><span class="pc-none">Begin reading the latest post</span>
In the PC view with a single-line layout, only “New” will be shown. In mobile view (600px or less), or in the sidebar, only “Begin reading the latest post” will be visible.
Responsive Layout
When the pagination is placed in areas narrower than 600px (like in mobile view or a sidebar), the pagination links will stack vertically for better readability. The “pc-none” and “sp-none” classes help manage what text is shown or hidden depending on the display width, allowing you to tailor the appearance of pagination links for both PC and mobile views.
How to Use Advanced Settings
Advanced Settings include more advanced features compared to general settings. In most basic WordPress themes, it is assumed that the pager will function correctly with only general settings. However, depending on your theme or customizations, the pager filtering feature may not work.By using Advanced Settings, you can enable the pager filtering feature if it does not work with general settings alone.
Saving and Applying Advanced Settings
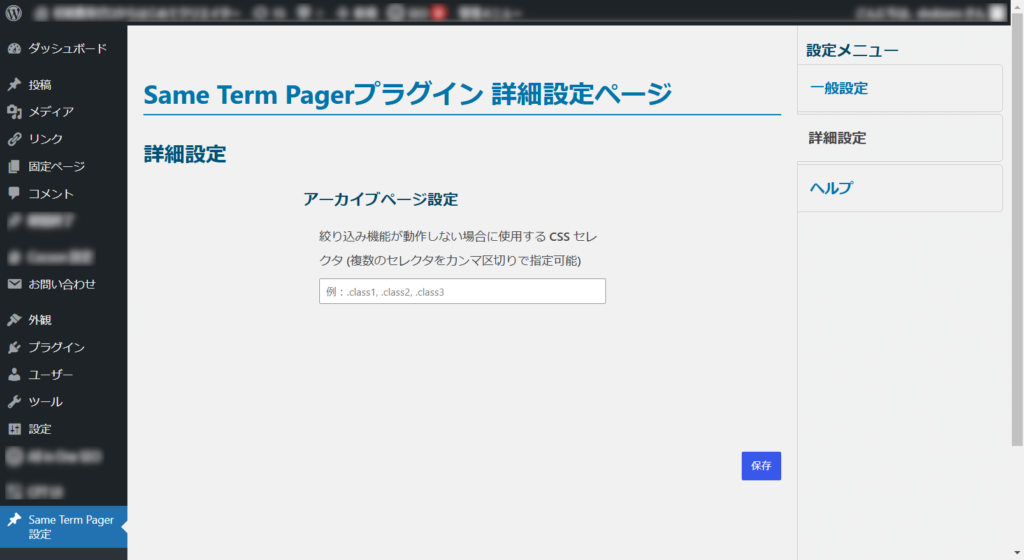
- Select “Advanced Settings”.
- Change each item as needed.
- Click the “Save” button located at the bottom right of the screen.
- A confirmation dialog will appear. If you want to save, click “OK”.
- Changes will be applied to the site.
Detailed Explanation of Advanced Settings
Archive Page Settings
- If the pager filtering feature does not work after navigating from various archive pages (category, tag, custom taxonomy), JavaScript will add URL parameters to the post links. If it is already working, leave this field blank.
- In the input field, enter the class names used in the <a> tags of post links within the article list on the archive page, prefixed with a period (.).
- Class names can be specified multiple times, separated by commas.
- Other CSS selectors besides class names can also be specified.
- If you enter characters that cannot be used in CSS selectors, you will not be able to save the settings.
Help Menu

The “Help” menu provides a simple guide for operating the settings, as well as support information. If you are unsure about something, refer to this page for useful information on how to operate the plugin or troubleshoot problems.
Notes and Tips
- Mobile Support: When the screen becomes narrow (e.g., on smartphone displays), the menu automatically adjusts to be displayed as horizontally arranged tabs.
- Troubleshooting: If there are display issues on the site after changing settings, reverting the most recent changes often resolves the problem.
コメント